


Module 3: .NET Web API on AWS App Runner
HANDS-ON LAB
Lab Objectives
In this hands-on lab, you’ll create a .NET Web API that uses a DynamoDB table, containerize it, and host it in AWS App Runner. You can perform this lab on a Windows PC, macOS, or Linux computer, or on a Cloud9 environment in the cloud.
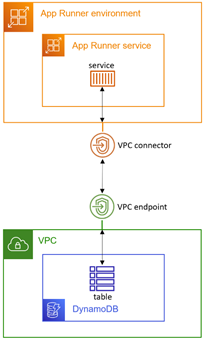
You’ll begin by creating a DynamoDB table and .NET 6 Web API project that accesses it. After testing that locally, you’ll use Docker and the AWS deployment tool for .NET CLI to containerize and deploy the software to the Amazon Elastic Container Registry (ECR). Then, you’ll create the App Runner service, along with the AWS artifacts needed to talk to DynamoDB, which will include an IAM role, a VPC connector, and a VPC endpoint for DynamoDB. You’ll test your application in the cloud and verify the app can retrieve data from DynamoDB. You’ll monitor your application in App Runner console and review logs. Lastly, you’ll update your project and push an update to ECR, and see App Runner automatically deploy it. Lastly, you’ll delete your application and its resources.
This lab has 12 steps:
- Set up AWS
- Set up your Development Environment
- Create DynamoDB Table
- Create .NET Web API project
- Test locally
- Publish Web API project to ECR
- Create IAM Role
- Create App Runner service
- Create a VPC Endpoint for DynamoDB
- Test in the Cloud
- Deploy an Update
- Shut it Down
Time to Complete
90 minutes
Implementation
Step 1: Set up AWS
In this step, you’ll set up your AWS environment.
If you’re already developing and deploying to AWS App Runner, and have the AWS Deployment Tool for .NET CLI installed, you can fast-forward to Step 3.
1. Obtain an AWS Account
Use an existing AWS account or create an AWS account. Do not use a Production account.
2. Choose AWS region
Sign in to the AWS console and choose an AWS region to work in that supports AWS App Runner and supports DynamoDB.
3. Create a Development Environment
If using your local machine for this lab, proceed to Step 2.
If using Cloud9, continue below.
Set up a Cloud9 environment from the AWS console:
A. In the AWS console, navigate to Cloud9 and click Create environment.
B. Name the environment AppRunnerLab.
C. Leave the defaults and click Create.
D. Wait for the environment to be created, which will take several minutes. If environment creation fails because the t2.micro instance type is not available in the region, repeat the above steps and select a different small instance type. If the instance type is not in the free tier, be mindful of the rate you will be charged for the duration of the lab.


Check Your Work
You should now have:
✓ An AWS account
✓ Know how to sign in to the AWS management console
✓ Selected a region to work in
✓ A local machine or Cloud9 environment available
Step 2: Set up your Development Environment
In this step, you will install software to set up a development environment. Skip over items you already have installed.
1. Install the AWS CLI
Install the AWS Command Line Interface (CLI).
2. Configure the AWS CLI
Configure the AWS CLI so it is linked to a user in your AWS account.
In a command/terminal window, configure the region with this command:aws configure
3. Install the .NET SDK
Install the .NET 6 SDK. Download and install the SDK for your operating system.
If using Cloud9, you can run these commands under Install Required Tools (Step 1 and Step 2). Then, run the following command: ./dotnet-install.sh -c LTS.
4. Install the AWS Development Tool for .NET CLI
In a command/terminal window, install the AWS Deployment tool for .NET CLI with this command:
dotnet tool install -g aws.deploy.tools
5. Install Docker
Install Docker Desktop. If you already have Docker, be aware that you need version 17.05 or later.
6. Install an IDE
Install an IDE, such as Microsoft Visual Studio 2022 (Windows), Visual Studio Code (Linux, macOS, Windows), or JetBrains Rider (Linux, macOS, Windows). Ensure you have installed the options or extensions for .NET web development in C#.
Check Your Work
You should now have:
✓ All prerequisite software installed
✓ Configured the AWS CLI for your AWS user and region
Step 3: Create DynamoDB Table
In this step, you'll create a DynamoDB table named Weather and create some data records.
1. Create DynamoDB table in AWS console
In the AWS console, navigate to Amazon DynamoDB and click Create table:
A. Table name: Weather
B. Partition key: Location
C. Sort key: Timestamp
D. Click Create table

2. Populate Table with Items
Click on the Weather table name to get to its detail page, then click Explore table items. Add these items:
A. Click Create item and JSON view. Enter the JSON below (Dallas, morning) and click Create Item.
{
  "Location": {
    "S": "Dallas"
  },
  "Timestamp": {
    "S": "2022-07-23T06:00:00"
  },
  "Summary": {
    "S": "Hot"
  },
  "TempC": {
    "N": "33"
  },
  "TempF": {
    "N": "92"
  }
}B. In the same way, add the second item (Dallas, mid-day) with this JSON:
{
  "Location": {
    "S": "Dallas"
  },
  "Timestamp": {
    "S": "2022-07-23T12:00:00"
  },
  "Summary": {
    "S": "Scorching"
  },
  "TempC": {
    "N": "43"
  },
  "TempF": {
    "N": "109"
  }
}C. Add the third item (Dallas, evening) with this JSON:.
{
  "Location": {
    "S": "Dallas"
  },
  "Timestamp": {
    "S": "2022-07-23T18:00:00"
  },
  "Summary": {
    "S": "Hot"
  },
  "TempC": {
    "N": "36"
  },
  "TempF": {
    "N": "97"
  }
}D. Add the fourth item (Minneapolis, morning) with this JSON:
{
  "Location": {
    "S": "Minneapolis"
  },
  "Timestamp": {
    "S": "2022-07-23T06:00:00"
  },
  "Summary": {
    "S": "Cool"
  },
  "TempC": {
    "N": "13"
  },
  "TempF": {
    "N": "56"
  }
}E. Add the fifth item (Minneapolis, mid-day) with this JSON:
{
  "Location": {
    "S": "Minneapolis"
  },
  "Timestamp": {
    "S": "2022-07-23T12:00:00"
  },
  "Summary": {
    "S": "Balmy"
  },
  "TempC": {
    "N": "22"
  },
  "TempF": {
    "N": "72"
  }
}F. Add the sixth item (Minneapolis, evening) with this JSON:
{
  "Location": {
    "S": "Minneapolis"
  },
  "Timestamp": {
    "S": "2022-07-23T18:00:00"
  },
  "Summary": {
    "S": "Balmy"
  },
  "TempC": {
    "N": "19"
  },
  "TempF": {
    "N": "67"
  }
}Check Your Work
You should now have:
✓ A DynamoDB table named Weather, populated with 6 items.


Step 4: Create .NET Web API project
In this step, you'll use the dotnet new command to create a Web API project, and update its code to retrieve data from the DynamoDB table.
1. CD to a development folder
Open a command/terminal window and CD to a development folder.:
2. Create a .NET WebAPI Project
Run the dotnet new command below to create a new Web API project named HelloAppRunnerVpc.
dotnet new webapi -n HelloAppRunnerVpc --framework net6.0

3. Open project in your IDE
Open the HelloAppRunnerVpc project in your IDE.
If you have an AWS Toolkit installed for your IDE, set the region in AWS Explorer to the region you selected in Step 1.
4. Review the Generated Project
The generated project is a WeatherForecast API, very commonly used in .NET samples.
To try it, press F5 and test it with Swagger. You'll see the service has a /WeatherForecast action that returns mock weather data JSON.
Stop the program from running.

5. Add AWS SDK NuGet Package
In the command/terminal window, CD to the project folder. Run the dotnet add package command below to add the AWS SDK NuGet package AWSSDK.DynamoDBv2 to the project:
cd HelloAppRunnerVpc
dotnet add package AWSSDK.DynamoDBv26. Modify Program.cs
Open Program.cs in the code editor, and remove or comment out this statement, which won’t be needed with App Runner:
//app.UseHttpsRedirection(); 7. Code the WeatherForecast class
OpenWeatherForecast.cs and replace it with the code below. This class holds an item retrieved from the Weather table:
namespace HelloAppRunnerVpc;

public class WeatherForecast
{
    public DateTime Date { get; set; }
    public int TemperatureC { get; set; }
    public int TemperatureF { get; set; }
    public string? Summary { get; set; }
} 8. Code the WeatherForecastController class
using Amazon;
using Amazon.DynamoDBv2;
using Amazon.DynamoDBv2.DocumentModel;
using Microsoft.AspNetCore.Mvc;

namespace HelloAppRunnerVpc.Controllers;

[ApiController]
[Route("")]
public class WeatherForecastController : ControllerBase
{
    static readonly RegionEndpoint region = RegionEndpoint.USEast1;

    private readonly ILogger _logger;

    public WeatherForecastController(ILogger<WeatherForecastController> logger)
    {
        _logger = logger;
    }

    [HttpGet("")]
    public string GetHealthcheck()
    {
        return "Healthcheck: Healthy";
    }

    [HttpGet("WeatherForecast")]
    public async Task<IEnumerable<WeatherForecast>> GetWeatherForecast(string location = "Dallas")
    {
        List<WeatherForecast> forecasts = new List<WeatherForecast>();

        try
        {
            _logger.LogInformation($"00 enter GET, location = {location}");

            var client = new AmazonDynamoDBClient(region);
            Table table = Table.LoadTable(client, "Weather");

            var filter = new ScanFilter();
            filter.AddCondition("Location", ScanOperator.Equal, location);

            var scanConfig = new ScanOperationConfig()
            {
                Filter = filter,
                Select = SelectValues.SpecificAttributes,
                AttributesToGet = new List<string> { "Location", "Timestamp", "TempC", "TempF", "Summary" }
            };

            _logger.LogInformation($"10 table.Scan");

            Search search = table.Scan(scanConfig);

            List<Document> matches;
            do
            {
                _logger.LogInformation($"20 table.GetNextSetAsync");
                matches = await search.GetNextSetAsync();
                foreach (var match in matches)
                {
                    forecasts.Add(new WeatherForecast
                    {
                        Date = Convert.ToDateTime(match["Timestamp"]),
                        TemperatureC = Convert.ToInt32(match["TempC"]),
                        TemperatureF = Convert.ToInt32(match["TempF"]),
                        Summary = Convert.ToString(match["Summary"])
                    });
                }
            } while (!search.IsDone);

            _logger.LogInformation($"30 exited results loop");

        }
        catch (Exception ex)
        {
            _logger.LogError(ex, "90 Exception");
        }

        _logger.LogInformation($"99 returning {forecasts.Count} results");

        return forecasts.ToArray();
    }
}9. Save Changes and Build
Save your changes and ensure the project builds.
Check Your Work
You should now have:
✓ A Web API project named HelloAppRunnerVpc
✓ Have set your region in WeatherForecastController.cs
Step 5: Test locally
In this step, you'll test the Web API locally and confirm data retrieval from DynamoDB.
1. Debug the Project
Press F5 in your IDE and wait for the app to build and launch in a browser.
2. Test the Health Check action
In the browser, remove the Swagger path from the URL to hit the service root, and you should see a health check message. App Runner will regularly ping the site to check health.

3. Test the Weather Forecast action for Dallas
Add /WeatherForecast?location=Dallas to the end of the URL path. You should see weather forecast data JSON appear, with values you created in the DynamoDB table in Step 1.

4. Test the Weather Forecast action for Minneapolis
Change the URL path to end in /WeatherForecast?location=Minneapolis. Now you see figures for that city.

5. Test the Weather Forecast action for an Invalid Location
Try another location name, and you see an empty response because there is no data for it in the table..
6. Stop the Program
Stop the program from running.
Although it was straightforward for our app to access DynamoDB when testing locally, that won't be the case in the cloud, because App Runner is restricted to public endpoints by default. We'll have to take the extra steps of adding a VPC connector for App Runner and a matching VPC endpoint for DynamoDB.
Check Your Work
You should now have:
✓ Tested your Web API project locally.
✓ Confirmed DynamoDB data is retrieved.
Step 6: Publish Web API project to ECR
1. Create a Dockerfile
FROM mcr.microsoft.com/dotnet/aspnet:6.0 AS base
WORKDIR /app
EXPOSE 80
EXPOSE 443

FROM mcr.microsoft.com/dotnet/sdk:6.0 AS build
WORKDIR /src
COPY ["HelloAppRunnerVpc.csproj", "."]
RUN dotnet restore "./HelloAppRunnerVpc.csproj"
COPY . .
WORKDIR "/src/."
RUN dotnet build "HelloAppRunnerVpc.csproj" -c Release -o /app/build

FROM build AS publish
RUN dotnet publish "HelloAppRunnerVpc.csproj" -c Release -o /app/publish

FROM base AS final
WORKDIR /app
COPY --from=publish /app/publish .
ENTRYPOINT ["dotnet", "HelloAppRunnerVpc.dll"]2. Deploy to ECR
Deploy your project as a container image to ECR:
a. In the command/terminal window, run this command to initiate deployment, specifying your preferred region. (Figure 1)
dotnet aws deploy --region us-west-2
b. Select the choice to Push Container Images to Amazon Elastic Container Registry (ECR)
c. On the Current Settings prompt, enter the number to change the Image tag, and set it too latest. (Figure 2)
d. Confirm deployment by pressing Enter.


3. Wait for Deployment
Wait for deployment to complete.

4. Confirm deployment in AWS console
Check Your Work
You should now have:
✓ Containerized your project with a Dockerfile.
✓ Deployed a container image to Amazon ECR.

Step 7: Create IAM Role
In this step, you'll use the AWS console to create an IAM role named AppRunnerInstanceDynamoDB. This role will allow the App Runner EC2 instances to access the DynamoDB table.
1. Create a Policy for DynamoDB Table Access
Create a policy that allows access to the Weather DynamoDB table:
a. Navigate to Identity and Access Management (IAM).
b. Select Policies from the left pane and click Create policy.
c. Create the policy and enter the JSON below, replacing [account] with your 12-digit AWS account number, and [region] with your region.
{
    "Version": "2012-10-17",
    "Statement": [
        {
            "Sid": "",
            "Effect": "Allow",
            "Action": "dynamodb:*",
            "Resource": "arn:aws:dynamodb:[region]:[account]:table/Weather"
        }
    ]
} d. Click Next: Tags and Next: Review. Name the policy ddb-Weather and click Create policy.


2. Create a Role for EC2 Instances
Create a role for App Runner EC2 instances:
a. Select Roles from the left pane and click Create role.
b. For Trusted entity type, select AWS service. (Figure 1)
c. For Use case, select EC2 and click Next. (Figure 1)
d. Search for and select these permissions: ddb-Weather, AmazonDynamoDBFullAccess, and AWSAppRunnerFullAccess. Then click Next. (Figure 2)
e. On the Trust relationships tab, click Edit trust policy. Replace with this JSON and click Update policy. (Figure 5)
{
    "Version": "2012-10-17",
    "Statement": [
        {
            "Effect": "Allow",
            "Principal": {
                "Service": [
                    "ec2.amazonaws.com",
                    "tasks.apprunner.amazonaws.com"
                ]
            },
            "Action": "sts:AssumeRole"
        }
    ]
} f. Name the role AppRunnerInstanceDynamoDB and click Create role. (Figure 3)
Check Your Work
You should now have:
✓ An IAM role named AppRunnerInstanceDynamoDB with 3 policies.


Step 8: Create App Runner service
In this step, you'll create the App Runner service and a VPC connector.
1. Create Service
In the AWS console, navigate to AWS App Runner and click Create service.
a. Repository type: Container registry. (Figure 1)
b. Provider: Amazon ECR.
c. Click Browse and select the container you deployed to ECR in Step 6. (Figure 2)
d. For Deployment settings trigger, select Automatic.
e. For ECR access role, select Create new service role.
f. Click Next.


2. Configure service
On the Configure service page,
a. Service name HelloAppRunnerVpc.
b. b. Port: 80.

3. Configure Instance Role
Expand the Security section and set Instance role to AppRunnerInstanceDynamoDB.

4. Create VPC Connector
Expand the Networking section and create a VPC connector:
a. Under Networking, select Custom VPC.
b. Under VPC connector, click Add new.
c. VPC connector name: AppRunnerDynamoDB. (Figure 1)
d. VPC: select your default VPC.
e. Subnets: select all subnets.
f. Security groups: select your default security group. (Figure 2)
g. Click Add. If you get an error message that one of your subnets doesn't support App Runner services, remove it from the Subnets list and click Add again. (Figure 2)
h. Click Next and Create & deploy.


5. Wait for Deployment
Wait for deployment, which will take several minutes. This is a good time for a break.

6. Record Service URL
When service deployment is complete, you'll see a Create service succeeded message.
Record the default domain URL. This is your service URL.
Refresh the Event log, and you should see confirmation the service is running.

7. Browse to Service URL
Browse to the URL, and you should see your health check. Our service is hosted in App Runner, but it isn't yet able to access DynamoDB. We've created the App Runner VPC connector, but we still need to create a matching VPC endpoint for DynamoDB.
Check Your Work
You should now have:
✓ A running AWS App Runner service named HelloAppRunnerVpc.
✓ The service endpoint URL.
✓ Confirmed the health check URL responds in a browser.

Step 9: Create a VPC Endpoint for DynamoDB
In this step, you'll create a VPC endpoint for DynamoDB.
1. In the AWS console, navigate to VPC
2. Create endpoint
Select Endpoints from the left panel and click Create endpoint.
a. Name: vpc-endpoint-dynamodb. (Figure 1)
b. b. Service category:: AWS service.
c. Service: enter DynamoDB in the search box and select com.amazonaws.region.dynamodb.
d. VPC: select your default VPC.
e. Route tables: select the Main route table.
f. Click Create endpoint. (Figure 2)
Check Your Work
You should now have:
✓ A VPC endpoint for DynamoDB named vpc-endpoint-dynamodb.


Step 10: Test in the Cloud
Now we're ready to put it all together and test the Web API in the cloud.
1. Visit Service URL
In a browser, visit the service URL you recorded in Step 6. You see the health check response.

2. Test Weather Forecast action for Dallas
Add /WeatherForecast?location=Dallas at the end of the path. Now you see records from Dallas that you entered in Step 1

3. Test Weather Forecast action for Minneapolis
3. Change the end of the path to /WeatherForecast?location=Minneapolis, and you see records for that location.
Congratulations! Your Web API is hosted in AWS App Runner, and the service is talking to DynamoDB.
Check Your Work
You should now have:
✓ Confirmed your AWS App Runner service is able to retrieve data from the DynamoDB table.

Step 11: Deploy an Update
In this step, you’ll update your web API, push an updated container, and watch App Runner automatically deploy the updated container to the service. It will do this because we configured Automatic Deployments in Step 8 when we created the service.
1. Modify the service
2. Build and test locally
Build and test the project locally to ensure it works as expected.
3. Redeploy the container
4. Monitor service redeployment
In the AWS App Runner console, watch your service. Shortly after the new container is deployed, App Runner will automatically deploy the update.
5. Test the updated Service
Wait for the update to complete, then test your service by browsing to it as you did in Step 10. Confirm you now see the new version of your output from the service.
Check Your Work
You should now have:
✓ Updated your Web API project with a change.
✓ Deployed an updated container to ECR.
✓ Confirmed App Runner automatically deployed the update.
Step 12: Shut it down
Feel free to experiment with changes to your project to test your knowledge.
When you're all done with the project, shut it down. You don't want to accrue charges for something you're not using.
1. Delete the App Runner service
In the AWS console, navigate to App Runner and delete the HelloAppRunnerVpc service
2. Delete the DynamoDB table
Navigate to DynamoDB and delete the Weather table
3. Delete the container image
Navigate to ECR and delete the helloapprunnervpc container image.
4. Delete the Cloud9 environment
If using Cloud9, navigate to Cloud9 and delete the AppRunnerLab environment.
Check Your Work
You should now have:
✓ Deleted the App Runner service.
✓ Deleted the DynamoDB table.
✓ Deleted the ECR container image.
Summary
In this lab, you created a DynamoDB table and populated it with data. You generated a .NET Web application project with the dotnet new command. You coded a Web API that retrieves weather data from the DynamoDB table. You deployed a container to ECR. You created an App Runner service to host the Web API. You create an App Runner VPC connector and a VPC endpoint for DynamoDB to connect the two services could connect. You tested the application, now hosted on AWS, and saw it work. You deployed an updated container to ECR and saw it automatically deployed to the App Runner service. Lastly, you deallocated your application from AWS.